Introduction
In this document the steps to build an app to handle an Arduino and 2 Raspberry boards using the SAndroidE framework are described.
The set up is composed by the following SAndroidE compatible/described devices:
- one Arduino UNO
- one BLE Shield v2.0 or later from RedBearLab
- two Raspberry Pi 3 (in this document will be called RaspA and RaspB)
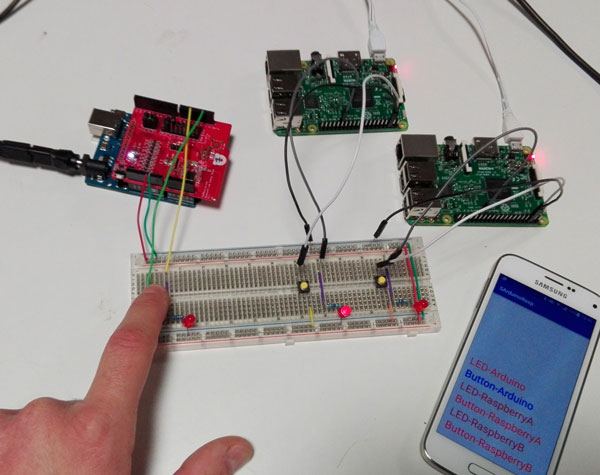
The system described allows to handle the buttons and leds attached to Arduino's and Raspberry pi3 GPIOs, exploiting a SAndroidE smartphone application. Arduino needs the BLE shield to communicate with smartphone via Bluetooth, whereas Bluetooth 4.1 is built-in for the Raspberry pi3.
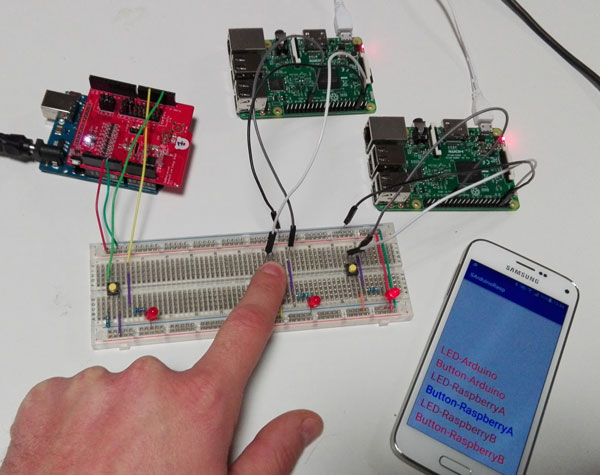
The application implements the following logic: pressing the button connected to Arduino lights up the led attached to RaspA. Pressing the button connected to RaspA lights up the led attached to RaspB and finally pressing the button connected to RaspB button lights up the led attached to the Arduino.
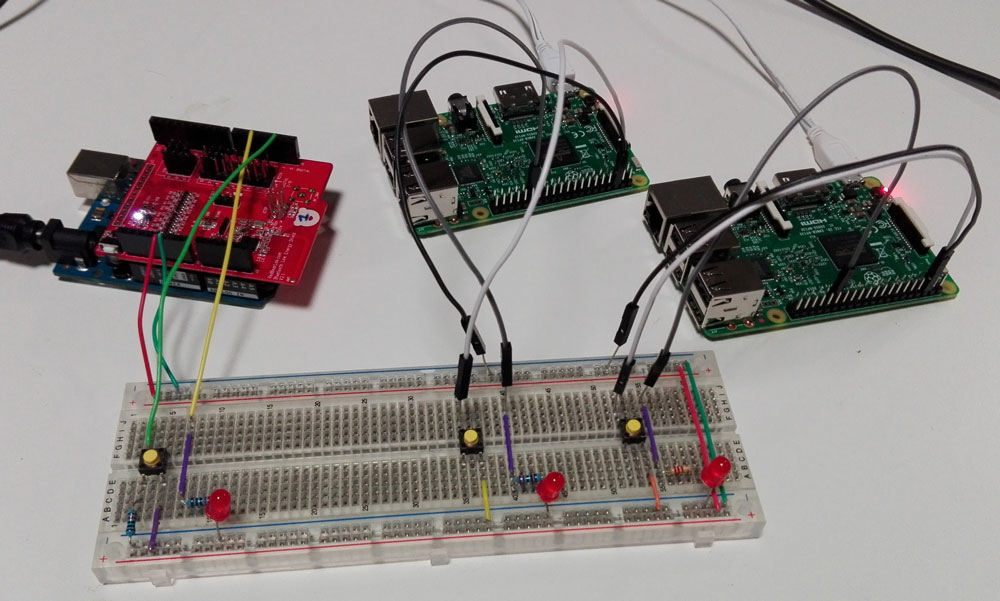
arduino-2rasp.jpg
NOTE: As you can see from the picture, the circuit for Arduino is different from those for the two Raspberry. This is due to the fact our Raspberry devices are set up in pull-up mode. We could eventually change the Raspberry mode or change our application source to invert HIGH and LOW values.
Requirements
- one Arduino UNO
- one BLE Shield v2.0 or later from RedBearLab
- two Raspberry Pi 3
- a smartphone supporting Bluetooth 4.0-4.1 (aka Bluetooth Smart)
- a micro USB cable to deploy application to your smartphone
- Android Studio
- SAndroidE zip package: download the zip file and extract to a directory
- basic programming knowledge of Android applications
Usage
Implementation consists of three steps:
- devices firmware flashing (if needed)
- enumerating the resources provided by external devices we want to interact with (only the first time)
- developing an Android app which exploits the SAndrodE framework to implement the desired application logic
Firmware flashing
Arduino
First of all, if needed, upload the 'BLEControllerSketch' fournished by RedBearLab as described at http://redbearlab.com/getting-started-bleshield to the Arduino. SAndroidE framework handles the the remote devices resources exploiting the description of the firmware provided by the xml files. How to describe a new device/firmware is described here.
Raspberry
Raspberry pi 3 is the notorious board which natively supports bluetooth 4.1. In order to make Raspberry acts like a bluetooth device the SAndroidE developer has created a nodejs script, which exploits bleno and onoff library to handle respectively bluetooth (exposing services) and GPIOs. The image of the already set up Raspberry can be found at the link reported on SAndroidE site (http://es3.unibs.it/SAndroidE/). For sake of semplicity in the remainder of the this document the nodejs script developed will be referred as 'firmware'.
Enumerating resources
The resources available on each device shall be enumerated, giving a unique id to each one, which gives the pointer to access at the resources by the framework.
Resources' enumeration requires to have the relative xml description files within the home of our smartphone internal storage. VERY IMPORTANT: withouth these files enumeration of resources and the following steps won't be possible: the BLEEmbeddedFlasher app would find the device but will not be able to handle their resources.
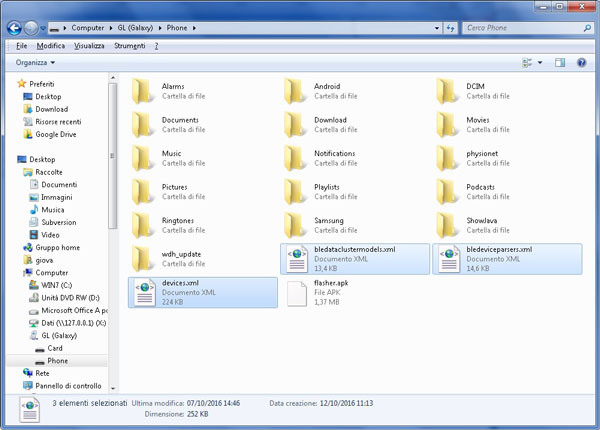
xml-files-to-device-int-storage-600px.jpg
Mandatory files to include are: devices.xml, bledeviceparsers.xml and bledataclustermodels.xml. Example of these files can be found in the SandroidE zip package.
Now start the BLEEmbeddedFlasher app to enumerate the device resources.
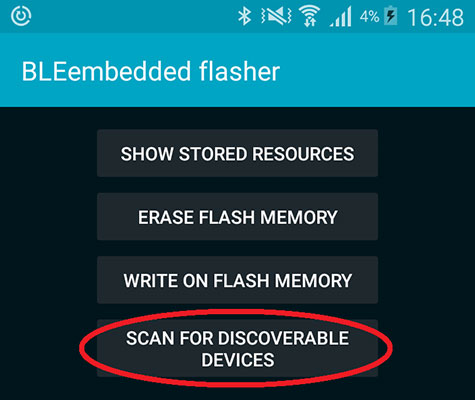
addressing-resources.jpg
In order to pair the device with the smartphone, we need first to make it discoverable, and then following the instruction in the figures below, to connect with it (to acquire device information) and giving it a unique name. In our case Arduino is discoverable as soon as it is powered up.
NOTE: If the devices is supported/described as previously described the BLE services and attributes will be shown after the connection with the remote device. It is very important to wait for the services and attributes to be shown before saving the resources.
In this example the device nickname is BLE Shield , whereas the name of the specific device is set as arduino.
NOTE: The nickname does not define the kind of the device, only the name in GAP characteristics does (this name is automatically checked by the SAndroidE library).
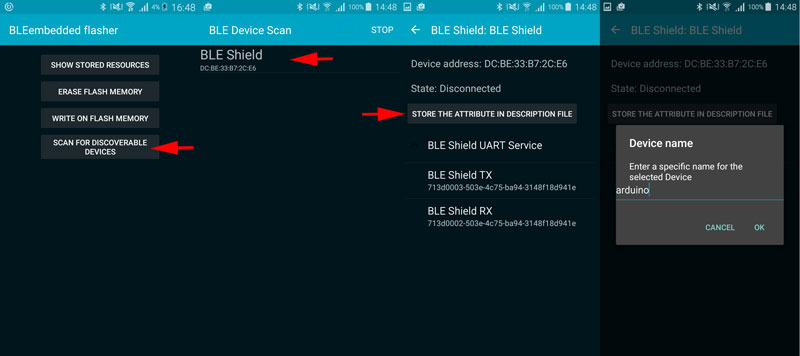
enumerating-arduino.jpg
The two Raspberry pi 3 boards nickname is Raspi_GPIOCommander, wheras the specific devices are named respectively raspA and raspB.
NOTE: The nickname does not define the kind of the device, only the name in GAP characteristics does (this name is automatically checked by the SAndroidE library).

enumerating-raspA.jpg
The configuration procedure aims to populate the bleresources.xml, the BLEEmbeddedFlasher application automatically adds them to the file. This procedure dinamically generated file, together with previously mentioned Configuration Files, are needed by the app developed for next step. In case the file already exists (reporting the information of the required devices), because the configuration procedure was previously done, there would be no need to repeat the configuration procedure.
App development
First of all install Android Studio, the official development environment to develop Android apps.
Creating the project
Start creating a project, with an empty activity, supporting the latest Android version.
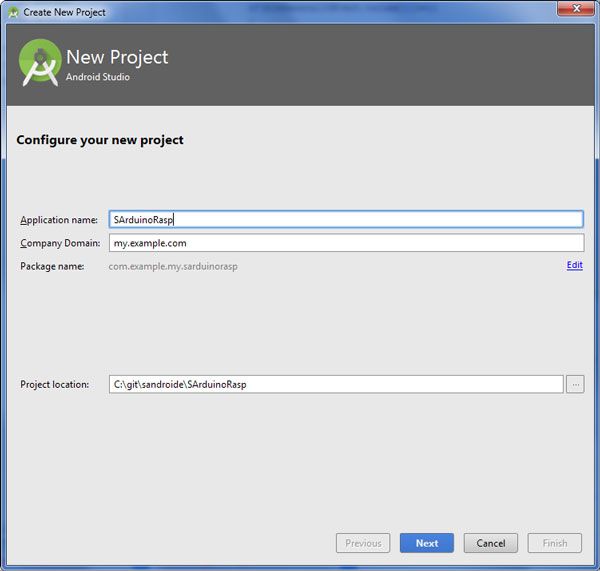
sarduinorasp.jpg
Choose the latest Android API available:
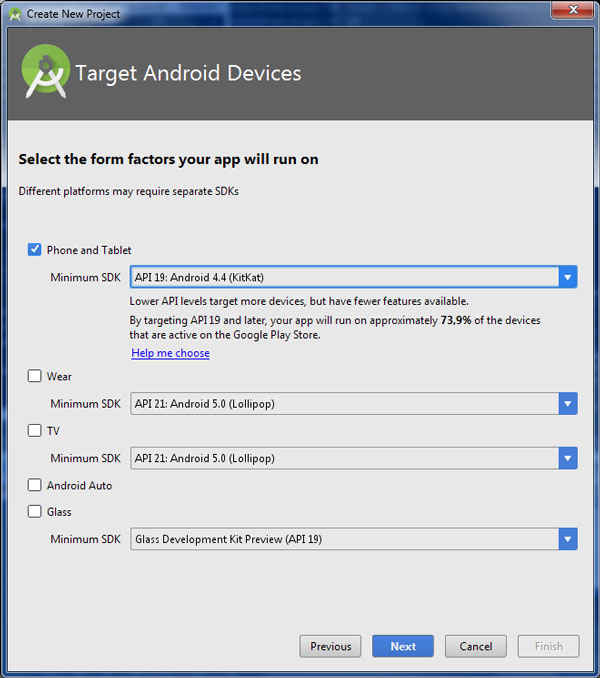
arduino-app-dev-11.jpg
Select to create an empty activity which would be filled with our app's layout:

arduino-app-dev-12.jpg
Take the default suggested MainActivity.java as name for our home activity:
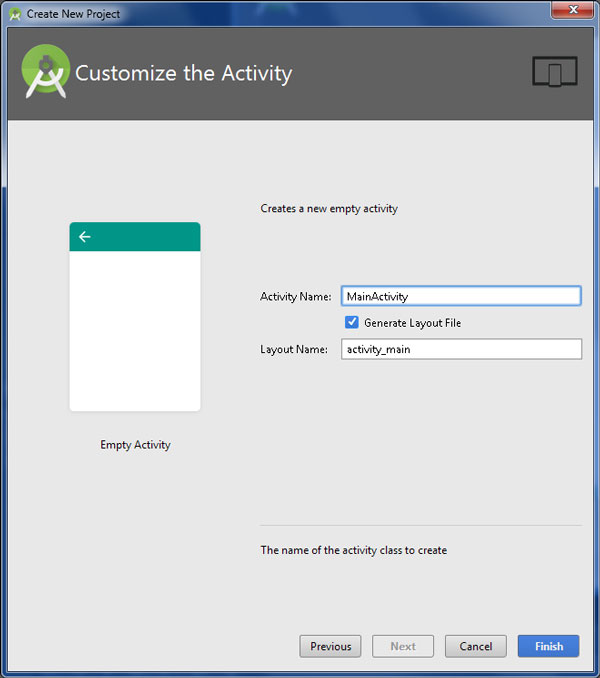
arduino-app-dev-13.jpg
Sandroide Library inclusion
Copy the SAndroidE.aar file from the zip to your app's libs folder.

arduino-app-dev-2.jpg
Then add the following lines into your app's build.gradle file and click on Sync now to include the library into your project.
#!java
        allprojects {
            repositories {
                jcenter()
                flatDir {
                    dirs 'libs'
                }
            }
        }

        dependencies {
            compile(name:'SAndroidE', ext:'aar')
        }
Your build.gradle should resemble like the one in the figure below:
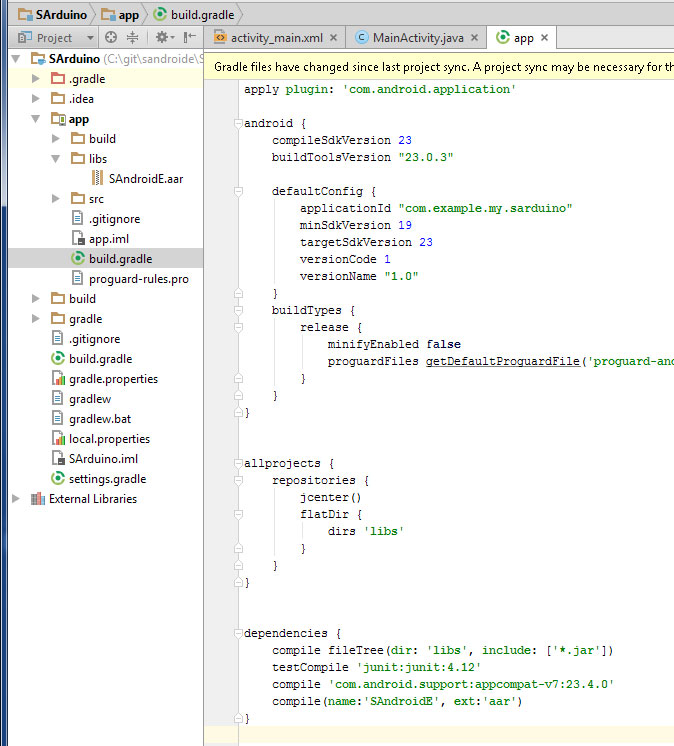
arduino-app-dev-3.jpg
Now the application has access to SAndroidE library classes.
NOTE: SAndroidE is currently provided as .aar Android library file, instead of the common Java library format (.jar), to let your app automatically inherit all the permissions required by SAndroidE framework for working correctly with your devices.
Writing the app
App's layout
The application layout is created by editing the file res/layout/activity_main.xml.
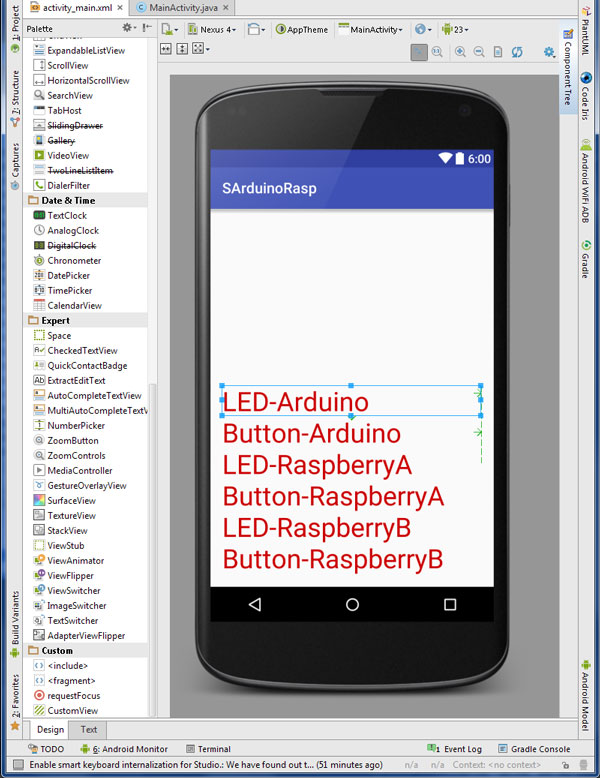
arduino-rasp-layout.jpg
The simple layout shown in figure above may be obtained by switching from Design to Text tab in Android Studio IDE and entering the following XML code:
#!xml
        <?xml version="1.0" encoding="utf-8"?>
        <RelativeLayout xmlns:android="http://schemas.android.com/apk/res/android"
            xmlns:tools="http://schemas.android.com/tools"
            android:layout_width="match_parent"
            android:layout_height="match_parent"
            android:paddingBottom="@dimen/activity_vertical_margin"
            android:paddingLeft="@dimen/activity_horizontal_margin"
            android:paddingRight="@dimen/activity_horizontal_margin"
            android:paddingTop="@dimen/activity_vertical_margin"
            tools:context="com.example.my.sarduinorasp.MainActivity">

            <TextView
                android:layout_width="wrap_content"
                android:layout_height="wrap_content"
                android:text="LED-Arduino"
                android:id="@+id/tvArduinoLed"
                android:textColor="@android:color/holo_red_dark"
                android:textSize="36sp"
                android:layout_above="@+id/tvArduinoButton"
                android:layout_alignParentStart="true"
                android:layout_alignEnd="@+id/tvArduinoButton" />

            <TextView
                android:layout_width="wrap_content"
                android:layout_height="wrap_content"
                android:text="Button-Arduino"
                android:id="@+id/tvArduinoButton"
                android:textColor="@android:color/holo_red_dark"
                android:textSize="36sp"
                android:layout_above="@+id/tvRaspALed"
                android:layout_alignParentStart="true"
                android:layout_alignEnd="@+id/tvRaspALed" />

            <TextView
                android:layout_width="wrap_content"
                android:layout_height="wrap_content"
                android:text="LED-RaspberryA"
                android:id="@+id/tvRaspALed"
                android:textColor="@android:color/holo_red_dark"
                android:textSize="36sp"
                android:layout_above="@+id/tvRaspAButton"
                android:layout_alignParentStart="true"
                android:layout_alignParentEnd="true" />

            <TextView
                android:layout_width="wrap_content"
                android:layout_height="wrap_content"
                android:text="Button-RaspberryA"
                android:id="@+id/tvRaspAButton"
                android:textColor="@android:color/holo_red_dark"
                android:textSize="36sp"
                android:layout_above="@+id/tvRaspBLed"
                android:layout_alignParentEnd="true"
                android:layout_alignParentStart="true" />


            <TextView
                android:layout_width="wrap_content"
                android:layout_height="wrap_content"
                android:text="LED-RaspberryB"
                android:id="@+id/tvRaspBLed"
                android:textColor="@android:color/holo_red_dark"
                android:textSize="36sp"
                android:layout_above="@+id/tvRaspBButton"
                android:layout_alignParentStart="true"
                android:layout_alignEnd="@+id/tvRaspAButton" />

            <TextView
                android:layout_width="wrap_content"
                android:layout_height="wrap_content"
                android:text="Button-RaspberryB"
                android:id="@+id/tvRaspBButton"
                android:textColor="@android:color/holo_red_dark"
                android:textSize="36sp"
                android:layout_alignParentBottom="true"
                android:layout_alignParentStart="true"
                android:layout_alignParentEnd="true" />


        </RelativeLayout>
App's logic
======================================== da qui =======================================
The application logic is implemented in the MainActivity.java file.
Both the objects called by the library, representing the remote resources, and the textviews shown on the app's User Interface are global variable:
#!java

        TextView tvArduinoButton,tvArduinoLed,tvRaspALed,tvRaspAButton,tvRaspBLed,tvRaspBButton;
        BLEGeneralIO arduinoButton,arduinoLed,raspALed,raspAButton,raspBLed,raspBButton;
Then in the activity's onCreate method the SAndroidE library is initializated by the means of the BLEContext.init method. It is mandatory to insert this method before any other operations related to the SAndrodE library.
#!java
        @Override
        protected void onCreate(Bundle savedInstanceState) {
            super.onCreate(savedInstanceState);
            setContentView(R.layout.activity_main);

            BLEContext.initBLE(this);

            ...
Link and initialize both remote resources and textviews:
#!java
        tvArduinoButton =(TextView) findViewById(R.id.tvArduinoButton);
        tvArduinoLed    =(TextView) findViewById(R.id.tvArduinoLed);
        tvRaspALed      =(TextView) findViewById(R.id.tvRaspALed);
        tvRaspAButton   =(TextView) findViewById(R.id.tvRaspAButton);
        tvRaspBLed      =(TextView) findViewById(R.id.tvRaspBLed);
        tvRaspBButton   =(TextView) findViewById(R.id.tvRaspBButton);

        arduinoLed = (BLEGeneralIO) BLEContext.findViewById("arduino_rbs_general_io_5");
        arduinoButton = (BLEGeneralIO) BLEContext.findViewById("arduino_rbs_general_io_2");

        raspALed = (BLEGeneralIO) BLEContext.findViewById("raspA_raspi_general_io_5");
        raspAButton = (BLEGeneralIO) BLEContext.findViewById("raspA_raspi_general_io_2");

        raspBLed = (BLEGeneralIO) BLEContext.findViewById("raspB_raspi_general_io_5");
raspBButton = (BLEGeneralIO) BLEContext.findViewById("raspB_raspi_general_io_2");NOTE: the String parameters passed to the methods, which initialize the SAndrodE Objects are the 'pointer' defined in the configuration procedure. This 'pointer' can be found in the bleresources.xml file. In the current release of the library (version 0.1) this file is stored in the private memory of the 'BLEEmbeddedFlasher' application, thus in order to work correctly the library needs the application to be installed. In the next releases this limitation will be eliminated
inserire spiegazione suffisso rbs e raspi?! perchè e dove sono definiti?!
Finally for each remote resource define the status of the GPIO (as input or output) and its behaviour, overriding the BLEOnGeneralIOEventListener interface methods. When a button is clicked, in a ring-like system, the led on the next board is lighted on and the related textViews on the app's UI changes color.
Below the full MainActivity.java source code is reported:
#!java
package com.example.my.sarduinorasp;
import android.graphics.Color;
import android.support.v7.app.AppCompatActivity;
import android.os.Bundle;
import android.util.Log;
import android.widget.TextView;
import eu.angel.bleembedded.lib.BLEContext;
import eu.angel.bleembedded.lib.item.generalIO.BLEGeneralIO;
import eu.angel.bleembedded.lib.item.generalIO.BLEGeneralIOEvent;
import eu.angel.bleembedded.lib.item.generalIO.BLEOnGeneralIOEventListener;
public class MainActivity extends AppCompatActivity {
protected static final String TAG = "MainActivity";
TextView tvArduinoButton,tvArduinoLed,tvRaspALed,tvRaspAButton,tvRaspBLed,tvRaspBButton;
BLEGeneralIO arduinoButton,arduinoLed,raspALed,raspAButton,raspBLed,raspBButton;
@Override
protected void onCreate(Bundle savedInstanceState) {
super.onCreate(savedInstanceState);
setContentView(R.layout.activity_main);
BLEContext.initBLE(this);
tvArduinoButton =(TextView) findViewById(R.id.tvArduinoButton);
tvArduinoLed =(TextView) findViewById(R.id.tvArduinoLed);
tvRaspALed =(TextView) findViewById(R.id.tvRaspALed);
tvRaspAButton =(TextView) findViewById(R.id.tvRaspAButton);
tvRaspBLed =(TextView) findViewById(R.id.tvRaspBLed);
tvRaspBButton =(TextView) findViewById(R.id.tvRaspBButton);
arduinoLed = (BLEGeneralIO) BLEContext.findViewById("arduino_rbs_general_io_5");
arduinoButton = (BLEGeneralIO) BLEContext.findViewById("arduino_rbs_general_io_2");
raspALed = (BLEGeneralIO) BLEContext.findViewById("raspA_raspi_general_io_5");
raspAButton = (BLEGeneralIO) BLEContext.findViewById("raspA_raspi_general_io_2");
raspBLed = (BLEGeneralIO) BLEContext.findViewById("raspB_raspi_general_io_5");
raspBButton = (BLEGeneralIO) BLEContext.findViewById("raspB_raspi_general_io_2");
arduinoLed.setOnGeneralIOEventListener(new BLEOnGeneralIOEventListener() {
@Override
public void onBoardInitEnded() {
arduinoLed.setStatus(BLEGeneralIO.GENERAL_IO_DO);
}
@Override
public void onDigitalInputValueChanged(BLEGeneralIOEvent bleGeneralIOEvent) {
}
@Override
public void onAnalogValueChanged(BLEGeneralIOEvent bleGeneralIOEvent) {
}
@Override
public void onDigitalOutputValueChanged(final BLEGeneralIOEvent bleGeneralIOEvent) {
(MainActivity.this).runOnUiThread(new Runnable() {
@Override
public void run() {
tvArduinoLed.setTextColor(bleGeneralIOEvent.values[1]==1?Color.BLUE:Color.RED);
}
}
);
}
@Override
public void onServoValueChanged(BLEGeneralIOEvent bleGeneralIOEvent) {
}
@Override
public void onPWMValueChanged(BLEGeneralIOEvent bleGeneralIOEvent) {
}
@Override
public void onGeneralIOStatusChanged(BLEGeneralIOEvent bleGeneralIOEvent) {
}
@Override
public void onSetGeneralIOParameter(BLEGeneralIOEvent bleGeneralIOEvent) {
}
});
arduinoButton.setOnGeneralIOEventListener(new BLEOnGeneralIOEventListener() {
@Override
public void onBoardInitEnded() {
arduinoButton.setStatus(BLEGeneralIO.GENERAL_IO_DI);
}
@Override
public void onDigitalInputValueChanged(BLEGeneralIOEvent bleGeneralIOEvent) {
Log.d(TAG, "arduino button pressing: "+ bleGeneralIOEvent.values[1]);
if(bleGeneralIOEvent.values[1]==1)
{
Log.d(TAG, "arduino led: setting HIGH");
raspALed.setDigitalValueHigh(true);
(MainActivity.this).runOnUiThread(new Runnable() {
@Override
public void run() {
tvArduinoButton.setTextColor(Color.BLUE);
}
}
);
} else {
Log.d(TAG, "arduino led: setting LOW");
raspALed.setDigitalValueHigh(false);
(MainActivity.this).runOnUiThread(new Runnable() {
@Override
public void run() {
tvArduinoButton.setTextColor(Color.RED);
}
}
);
}
}
@Override
public void onAnalogValueChanged(BLEGeneralIOEvent bleGeneralIOEvent) {
}
@Override
public void onDigitalOutputValueChanged(BLEGeneralIOEvent bleGeneralIOEvent) {
}
@Override
public void onServoValueChanged(BLEGeneralIOEvent bleGeneralIOEvent) {
}
@Override
public void onPWMValueChanged(BLEGeneralIOEvent bleGeneralIOEvent) {
}
@Override
public void onGeneralIOStatusChanged(BLEGeneralIOEvent bleGeneralIOEvent) {
}
@Override
public void onSetGeneralIOParameter(BLEGeneralIOEvent bleGeneralIOEvent) {
}
});
raspALed.setOnGeneralIOEventListener(new BLEOnGeneralIOEventListener() {
@Override
public void onBoardInitEnded() {
raspALed.setStatus(BLEGeneralIO.GENERAL_IO_DO);
}
@Override
public void onDigitalInputValueChanged(BLEGeneralIOEvent bleGeneralIOEvent) {
}
@Override
public void onAnalogValueChanged(BLEGeneralIOEvent bleGeneralIOEvent) {
}
@Override
public void onDigitalOutputValueChanged(final BLEGeneralIOEvent bleGeneralIOEvent) {
(MainActivity.this).runOnUiThread(new Runnable() {
@Override
public void run() {
tvRaspALed.setTextColor(bleGeneralIOEvent.values[1]==1?Color.BLUE:Color.RED);
}
}
);
}
@Override
public void onServoValueChanged(BLEGeneralIOEvent bleGeneralIOEvent) {
}
@Override
public void onPWMValueChanged(BLEGeneralIOEvent bleGeneralIOEvent) {
}
@Override
public void onGeneralIOStatusChanged(BLEGeneralIOEvent bleGeneralIOEvent) {
}
@Override
public void onSetGeneralIOParameter(BLEGeneralIOEvent bleGeneralIOEvent) {
}
});
raspAButton.setOnGeneralIOEventListener(new BLEOnGeneralIOEventListener() {
@Override
public void onBoardInitEnded() {
raspAButton.setStatus(BLEGeneralIO.GENERAL_IO_DI);
}
@Override
public void onDigitalInputValueChanged(BLEGeneralIOEvent bleGeneralIOEvent) {
Log.d(TAG, "raspA button pressing: "+ bleGeneralIOEvent.values[1]);
if(bleGeneralIOEvent.values[1]==0)
{
Log.d(TAG, "raspA led: setting HIGH");
raspBLed.setDigitalValueHigh(true);
(MainActivity.this).runOnUiThread(new Runnable() {
@Override
public void run() {
tvRaspAButton.setTextColor(Color.BLUE);
}
}
);
} else {
Log.d(TAG, "raspA led: setting LOW");
raspBLed.setDigitalValueHigh(false);
(MainActivity.this).runOnUiThread(new Runnable() {
@Override
public void run() {
tvRaspAButton.setTextColor(Color.RED);
}
}
);
}
}
@Override
public void onAnalogValueChanged(BLEGeneralIOEvent bleGeneralIOEvent) {
}
@Override
public void onDigitalOutputValueChanged(BLEGeneralIOEvent bleGeneralIOEvent) {
}
@Override
public void onServoValueChanged(BLEGeneralIOEvent bleGeneralIOEvent) {
}
@Override
public void onPWMValueChanged(BLEGeneralIOEvent bleGeneralIOEvent) {
}
@Override
public void onGeneralIOStatusChanged(BLEGeneralIOEvent bleGeneralIOEvent) {
}
@Override
public void onSetGeneralIOParameter(BLEGeneralIOEvent bleGeneralIOEvent) {
}
});
raspBLed.setOnGeneralIOEventListener(new BLEOnGeneralIOEventListener() {
@Override
public void onBoardInitEnded() {
raspBLed.setStatus(BLEGeneralIO.GENERAL_IO_DO);
}
@Override
public void onDigitalInputValueChanged(BLEGeneralIOEvent bleGeneralIOEvent) {
}
@Override
public void onAnalogValueChanged(BLEGeneralIOEvent bleGeneralIOEvent) {
}
@Override
public void onDigitalOutputValueChanged(final BLEGeneralIOEvent bleGeneralIOEvent) {
(MainActivity.this).runOnUiThread(new Runnable() {
@Override
public void run() {
tvRaspBLed.setTextColor(bleGeneralIOEvent.values[1]==1?Color.BLUE:Color.RED);
}
}
);
}
@Override
public void onServoValueChanged(BLEGeneralIOEvent bleGeneralIOEvent) {
}
@Override
public void onPWMValueChanged(BLEGeneralIOEvent bleGeneralIOEvent) {
}
@Override
public void onGeneralIOStatusChanged(BLEGeneralIOEvent bleGeneralIOEvent) {
}
@Override
public void onSetGeneralIOParameter(BLEGeneralIOEvent bleGeneralIOEvent) {
}
});
raspBButton.setOnGeneralIOEventListener(new BLEOnGeneralIOEventListener() {
@Override
public void onBoardInitEnded() {
raspBButton.setStatus(BLEGeneralIO.GENERAL_IO_DI);
}
@Override
public void onDigitalInputValueChanged(BLEGeneralIOEvent bleGeneralIOEvent) {
Log.d(TAG, "raspB button pressing: "+ bleGeneralIOEvent.values[1]);
if(bleGeneralIOEvent.values[1]==0)
{
Log.d(TAG, "raspB led: setting HIGH");
arduinoLed.setDigitalValueHigh(true);
(MainActivity.this).runOnUiThread(new Runnable() {
@Override
public void run() {
tvRaspBButton.setTextColor(Color.BLUE);
}
}
);
} else {
Log.d(TAG, "raspB led: setting LOW");
arduinoLed.setDigitalValueHigh(false);
(MainActivity.this).runOnUiThread(new Runnable() {
@Override
public void run() {
tvRaspBButton.setTextColor(Color.RED);
}
}
);
}
}
@Override
public void onAnalogValueChanged(BLEGeneralIOEvent bleGeneralIOEvent) {
}
@Override
public void onDigitalOutputValueChanged(BLEGeneralIOEvent bleGeneralIOEvent) {
}
@Override
public void onServoValueChanged(BLEGeneralIOEvent bleGeneralIOEvent) {
}
@Override
public void onPWMValueChanged(BLEGeneralIOEvent bleGeneralIOEvent) {
}
@Override
public void onGeneralIOStatusChanged(BLEGeneralIOEvent bleGeneralIOEvent) {
}
@Override
public void onSetGeneralIOParameter(BLEGeneralIOEvent bleGeneralIOEvent) {
}
});
}
}
NOTE: As you can see from the source code above, in the onDigitalInputValueChanged method for Raspberry buttons, the state of the button is tested against the value zero (which means HIGH value in our Raspberry configuration), as opposed to the code implemented for Arduino button, where the button state is tested against 1 (which is the HIGH value in our Arduino configuration). This behaviour is related to the circuit design of the button stage, because the Raspberry GPIO used is pulled up by default on input state (Arduino GPIO input is always in high impedance configuration). Changing the Raspberry GPIO input configuration (and obviously the circuit design properly) it's possible force the same behaviour for all the buttons.
Let's run it
Finally run the application by connecting the PC and the smartphone with the USB micro cable. Clicking Run button in Android Studio and selecting the connected smartphone the application will be deployed and run on it.
In this example, pressing the button attached to to Arduino will light on the led attached to RaspA. Pressing the button attached to RaspA will light on the led attached to RaspB and finally pressing the button attached to RaspB will light on the led attached to Arduino. The textViews on app's UI change color accordingly with the behaviour of the related button/led.
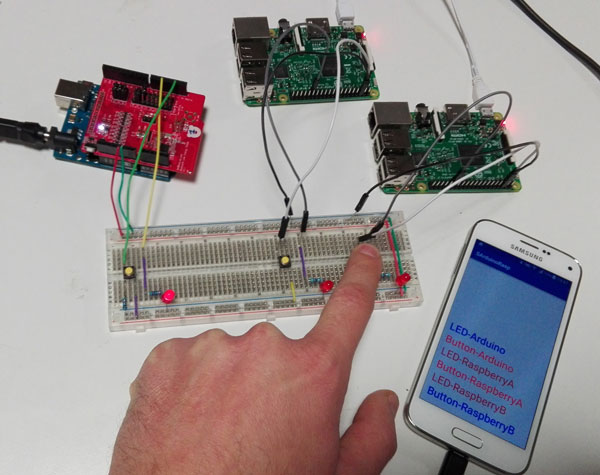
NOTE: As you can see from the picture, the textviews for Raspberry leds within the app's interface seem apparently to not work correctly. This is the expected behaviour, because the Raspberry 'firmware' used for this example, does not send any update on the state of the digital output, thus the related callback onDigitalOutputValueChanged is never triggered (this is a good example on how different 'firmwares' can act on the library items in different ways).
NOTE: If devices do not connect at startup, please shutdown all Bluetooth applications already running, like the BleembeddedFlasher app or previously launched versions of our app.