Using BLE Beacons in SAndroidE
SAndroidE supports the use of BLE Beacons leveraging on the management layer provided by the famous AltBeacon library. To use a Beacon in Android using SAndroidE application you should:
- Be sure that all the base configuration files:
- bleparsers.xml
- bledeviceparsers.xml are in place into the phone's root directory. For further information about the SAndroidE configuration files please refer to the detailed page.
- Install the SAndroidE Beacon Config App
- Use the SAndroidE Beacon Config App to detect your beacons and create the necessary Beacon Clusters
- Start your project in Android Studio
- Add SAndroidE library
- Build your application logic
The points from 1, 4, 5 are described in other tutorials, please use the links above for further information.
In this tutorial we will learn how to configure the beacon application for SAndroidE (points 2, 3) and to develope your own beacon App powered by SAndroidE (point 6).
Install the SAndroidE Beacon Config App
The SAndroidE Beacon Config App is provided as .apk file, in the SAndroidE package. To install the .apk on your smartphone please follow the Android documentation instructions. If the installation process has been successful you should see the SAndroidE Beacon App icon on your menu as shown in the figure below.
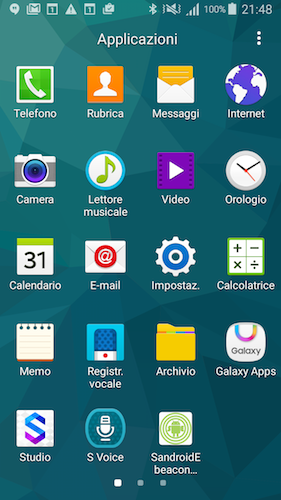
Android menu with the SAndroidE Beacon App icon
Fig. 1
Detecting your beacons and creating the necessary Beacon Clusters
The main activity of the app is shown in Fig. 2. In order to start the configuration tap on the Start Cluster configuration button (Fig. 2A), the app should starts to scan the neighborhood for beacons and it will list the founded beacons in the list under the label Beacons. Each beacon is listed showing its main information as the IDs and RSSI.
NOTE: The application finds and shows only the beacons, whose protocols are described in the bleparsers.xml file.
Now is necessary to add the detected beacons to one or more Beacon CLusters. A Beacon Cluster is a logic group of beacons, which belong to the same concept/application (e.g. the shoes tags, the living room objects, the rooms of my house...) independently from the protocol implemented by the beacons. Each application can have many clusters with one or more beacons each. Is up to you to define the right number of clusters depending on your needs. In this tutorial we will create one cluster called home and we will add one detected beacon to it. To create more clusters or add more beacon just iterate the following process. Once the app has detected the beacon of interest, making tap on its entry in the Beacons list (Fig. 2B), you will prompt to insert the name of the beacon (Fig. 2C). This name is a mnemonic string used to make the beacon identifiable by the users.
TIP: Be sure to use a name that is useful for your application avoiding numbers, letters and codes if it is not necessary
In the example the beacon colour is light blue so it's called ICE. After the insertion of the name make tap on the ok button. At this point the app will show the Cluster Configuration Activity (Fig. 2D) allowing us to add the beacon ICE into a cluster. As it can be seen, there is no Beacon Clusters listed under the label Clusters: thus a new one has to be created.
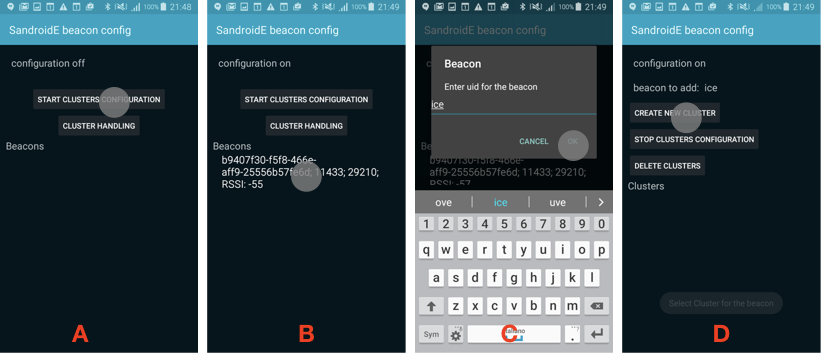
The main interface
Fig. 2
Clicking the Create new Cluster button (Fig. 3A) the new Cluster will be created. The app will prompt you to insert the name of the new cluster (Fig. 3B), in this example the new Cluster is named home; clicking the ok button let the app return to the Cluster Configuration Activity, where the new cluster home should be shown in the list under the label Clusters: (Fig. 3C). To add the beacon ICE to the cluster home make tap on the name of the cluster. The app will prompt a message to confirm the binding (Fig. 3D), tap yes. The app will return at the Cluster Configuration Activity.
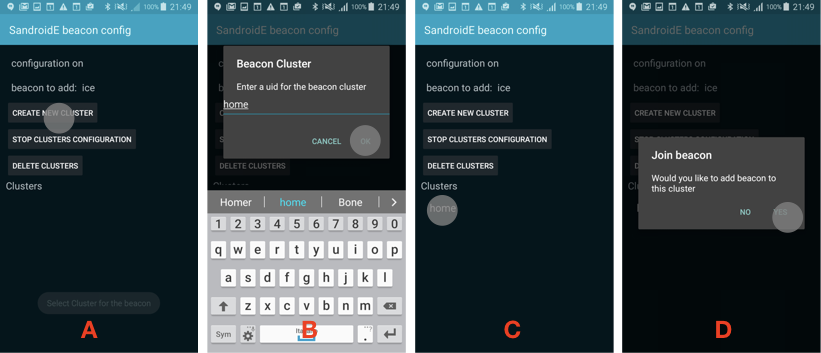
The main interface to create a new cluster
Fig. 3
In order to add a new beacon click the Android back button, returning to the main activity, and iterate the process for each beacon you need.
WARNING: actually, after a beacon has been added to a cluster it is not removed from the list of available beacons in the Main activity. Be careful to do not add the same beacon to different Clusters.
When you have added all the beacons tap the Stop Cluster Configuration button (Fig. 4A) and close the app. If the configuration has been successful you should be able to find the file blebeaconclusters.xml in the home directory of your smartphone.
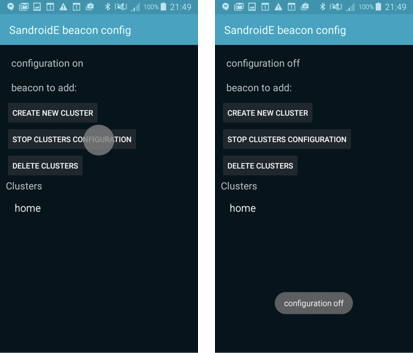
BlEapp3.png
Fig. 4
Use the beacons in your application
In order to use the configured BLE Beacons into an application you have to init the SAndroidE BLE context into the onCreate method of your main activity:
#!java
        @Override
        public void onCreate(Bundle savedInstanceState) {
            super.onCreate(savedInstanceState);
            ....
            BLEContext.initBLE(this);
Apps detect and interact with beacons in two different ways:
- Monitoring: actions triggered on entering/exiting region’s range;
- Ranging: actions triggered based on proximity to a beacon;
After the initialization of the library, we have to initialize the BeaconManager. In order to know what is a BeaconManager and its role into the SAndroidE framework please refer to the SAndroidE Functional documentation. The BeaconManager manages both the beacon monitoring and the ranging fuctionalities. Each one has a related Notifier interface:
- BLEBeaconRangeNotifier for Ranging
- BLEBeaconMonitorNotifier for Monitoring
Starting the notifier with the implemented related interface the application immediatly begins the functionality. For the BLEBeaconRangeNotifier
#!java
        BLEBeaconManager.startBeaconRangeNotifier(new BLEBeaconRangeNotifier() {
                    @Override
                    public void didRangeBeaconsInRegion(Collection<BLEBeacon> bleBeacons, BLEBeaconRegion region, BLEBeaconCluster bleBeaconCluster) {
                    ...
                    do some stuff when the Beacon is in the region of interest.
                    ...
                    }
                });
for the BLEBeaconMonitorNotifier:
#!java
        BLEBeaconManager.startBeaconMonitorNotifier(new BLEBeaconMonitorNotifier() {
                    @Override
                    public void didEnterCluster(BLEBeaconCluster bleBeaconCluster, BLEBeaconRegion bleBeaconRegion) {
                        ...
                        do some stuff when the smartphone enter the Beacon cluster
                        ...
                    }

                    @Override
                    public void didExitCluster(BLEBeaconCluster bleBeaconCluster, BLEBeaconRegion bleBeaconRegion) {
                            ...
                            do some stuff when the smartphone exit the Beacon Cluster
                            ...
                    }

                    @Override
                    public void didDetermineStateForCluster(int i, BLEBeaconCluster bleBeaconCluster) {
                        ...
                        TODO questo cosa significa?????
                        ...
                    }
                });