Introduction
In this document the steps to build an app to handle an Arduino board, an Estimote beacon and a Texas device, using the SAndroidE framework are described.
The set up is composed by the following SAndroidE compatible/described devices:
- one Arduino UNO
- one BLE Shield v2.0 or later from RedBearLab
- one Estimote beacon
- one CC2541 Mini Development Kit from Texas Instruments
Before going further, it is suggested to read the Getting started guide, how to use beacons in SAndroidE and interacting with a Texas device.
The system described here is meant to recognize our presence (the beacon we hold with us), inside or near a specified location (our home), where we would put all our devices and the Android based smartphone or tablet which runs the SAndroidE app.
In this example, the SAndroidE app should connect the three devices together by enabling/disabling both the led, physically connected to Arduino, and the alarm provided on Texas device when the beacon enters/leaves a specified range from the house.
NOTE: Here the led and the alarm are used as example only, as visual and acoustic notification to test if the app works correctly. Of course, this app may come much more useful by connecting an electronic lock to the Arduino using a relè, in order to open or close the house main door.
arduino-beacon-texas.jpg
Requirements
- one Arduino UNO
- one BLE Shield v2.0 or later from RedBearLab
- one Estimote beacon
- one CC2541 Mini Development Kit from Texas Instruments
- a smartphone supporting Bluetooth 4.0-4.1 (aka Bluetooth Smart)
- a micro USB cable to deploy application to your smartphone
- Android Studio
- SAndroidE zip package: download and exctract the zip file
- basic programming knowledge of Android applications
Usage
Implementation consists of three steps:
- devices firmware flashing (if needed)
- enumerating the resources provided by external devices we want to interact with (only the first time)
- developing an Android app which exploits the SAndrodE framework to implement the desired application logic
Firmware flashing
First of all, we need to flash the Arduino to let it work with the Red Bear shield. Then we need to flash the Texas device with the default firmare provided by the manufacturer.
Enumerating resources
Both Arduino and Texas device should be enumerated on our smartphone, which means they should be given a name, in order to let our SAndroidE app, which will run on that smartphone, be able to find and connect to them.
You can similarly enumerate Arduino by naming it as arduino and enumerate Texas device by naming it as bell.
Enumerating the third device instead, the Estimote beacon, is slightly different. As explained in How to use Beacons in SAndroidE, beacon enumeration should be done using the Sandroide Beacon Config app, provided within the framework zip package. This app enables to group beacons in logical sets and giving each set a name.
In this example a unique cluster, containing one beacon is created and named doorlock. Adding more beacons to the cluster may be useful to allow more people to enter the house. In other words, beacons assigned to the doorlock cluster will enable their owners to unlock the door and enter the house.
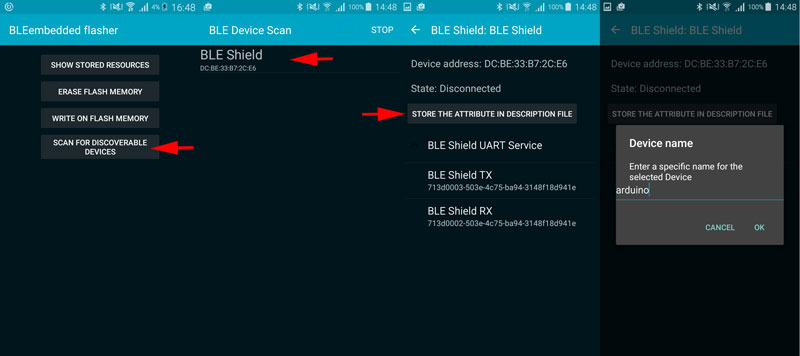
enumerating-arduino.jpg
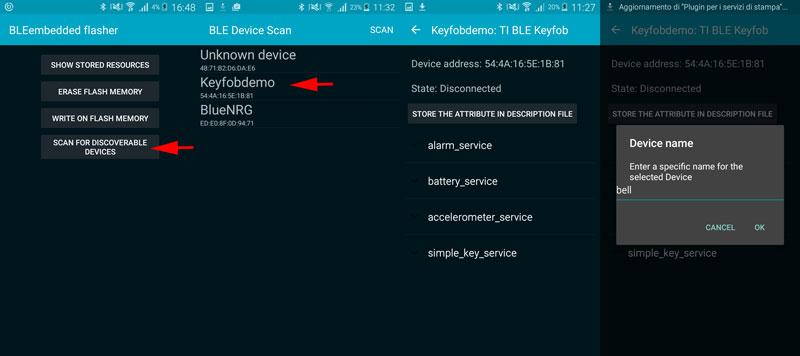
enumerating-texas.jpg
App development
Start by creating a new Android Studio project and add the SAndroidE library, in the same way as described in the Getting started guide. ### App's UI: Activity layout
Then let's create the application layout by editing the file res/layout/activity_main.xml.
arduino-beacon-texas-layout.jpg
Here is the source code available for copy/paste:
#!xml
        <LinearLayout xmlns:android="http://schemas.android.com/apk/res/android"
            android:orientation="vertical"
            android:layout_width="match_parent"
            android:layout_height="wrap_content">

            <TextView
                android:layout_width="wrap_content"
                android:layout_height="wrap_content"
                android:text="Far from home: Door locked"
                android:id="@+id/tvDoorState"
                android:textColor="@android:color/holo_red_dark"
                android:textSize="36sp" />

        </LinearLayout>
The app's UI consists of a plain textview to show the state of the door lock: locked or unlocked.
App's logic: activity source code
The application logic is implemented in the MainActivityArduinoBeaconTexas.java file.
Both the virtual objects called by the SAndroidE library, which handle the remote resources, and the textviews shown on the app's User Interface are declared as global variable. Furthermore, a CountDownTimer object is defined. It will comes useful to lock the door if no beacons are found in a given time interval.
#!java
        TextView tvDoorState;
        BLEGeneralIO arduinoLed;
        BLEAlarm tiAlarm;

        CountDownTimer noBeaconsInRangeTimer;
In the activity's onCreate method the SAndroidE library is initializated by the means of the BLEContext.init method. It is mandatory to insert this method before any other operations related to the SAndrodE library.
#!java
        @Override
        protected void onCreate(Bundle savedInstanceState) {
            super.onCreate(savedInstanceState);
            setContentView(R.layout.activity_main);

            BLEContext.initBLE(this);

            ...
In onCreate method both SAndroidE virtual Objects and textviews are initialized:
#!java
        tvDoorState =(TextView) findViewById(R.id.tvDoorState);
        arduinoLed = (BLEGeneralIO) BLEContext.findViewById("arduino_rbs_general_io_5");
        tiAlarm = (BLEAlarm) BLEContext.getSystemService(BLEContext.ALARM_SERVICE, "bell_key_alarm");
NOTE: the String parameters passed to the methods, which initialize the SAndrodE Objects are the 'pointer' defined in the configuration procedure. This 'pointer' can be found in the bleresources.xml file. In the current release of the library (version 0.1) this file is stored in the private memory of the 'BLEEmbeddedFlasher' application, thus in order to work correctly the library needs the application to be installed. The parameters can be checked by the 'BLEEMbeddedFlasher' app. In the next releases this limitation will be eliminated.
To handle the GPIO SAndroidE library make available the BLEOnGeneralIOEventListener interface, which is passed to the SAndroidE Object by the means of the 'setOnGeneralIOEventListener' method. When the board is inited the 'onBoardInitEnded' method is triggered, thus the status of the GPIO is defined in this callback. Other methods from the BLEGeneralIO interface are overriden but left empty, because they are useful for our application.
As one may notice, only the led connected to Arduino is used in this example. The button connected to Arduino is not used in this app, thus it isn't neither defined within the source code.
The following code initializes the led connected to Arduino as a digital output:
#!java
         arduinoLed.setOnGeneralIOEventListener(new BLEOnGeneralIOEventListener() {
            @Override
            public void onBoardInitEnded() {
                arduinoLed.setStatus(BLEGeneralIO.GENERAL_IO_DO);
                arduinoLed.setDigitalValueHigh(false);
            }

            @Override
            public void onDigitalInputValueChanged(BLEGeneralIOEvent bleGeneralIOEvent) {}

            @Override
            public void onAnalogValueChanged(BLEGeneralIOEvent bleGeneralIOEvent) {
            }

            @Override
            public void onDigitalOutputValueChanged(BLEGeneralIOEvent bleGeneralIOEvent) {}

            @Override
            public void onServoValueChanged(BLEGeneralIOEvent bleGeneralIOEvent) {

            }

            @Override
            public void onPWMValueChanged(BLEGeneralIOEvent bleGeneralIOEvent) {

            }

            @Override
            public void onGeneralIOStatusChanged(BLEGeneralIOEvent bleGeneralIOEvent) {

            }

            @Override
            public void onSetGeneralIOParameter(BLEGeneralIOEvent bleGeneralIOEvent) {

            }
        });
Now it's time to handle the beacons. As described in the Beacons How to we can use the BLEBeaconManager.startBeaconRangeNotifier method to provide a callback to be executed each time a beacon advertisement message is received from the smartphone.
In this callback a check on the beacon cluster is first performed: if the beacon is one belonging to the doorlock cluster, then it is granted to open the door. In this case, the distance of the beacon from the smartphone is checked, by checking the raw RSSI value. If this value is lower than a given thresold, then the door is unlocked, and both led and alarm are turned on.
Each time a beacon advertising message is received and conditions above met, a countdown timer is restarted. If the countdown, set to 10 seconds, finishes withouth being restarted, it means that no beacons message have been received in this time interval. This may indicate one of these things:
- beacons are gone out of range
- beacons have been turned off
- beacons batteries have exhausted
In cases above a same action is taken: both led and alarm are turned off and the door state changes to locked.
#!java

        BLEBeaconManager.startBeaconRangeNotifier(new BLEBeaconRangeNotifier() {
            @Override
            public void didRangeBeaconsInRegion(Collection<BLEBeacon> bleBeacons,
                                                BLEBeaconRegion region,
                                                BLEBeaconCluster bleBeaconCluster) {
                boolean isNear = false;
                if ("doorlock".equals(bleBeaconCluster.getUniqueId())){
                    for (BLEBeacon bleBeacon:bleBeacons){
                        if (bleBeacon.getRssi()>-70){
                            isNear=true;
                        }
                    }
                    if (isNear) {
                        Log.d(TAG, "door lock beacons in range: unlock the door / turn on led" + "--" + arduinoLed.getDigitalValue() + "," + arduinoLed.getStatus());
                        arduinoLed.setDigitalValueHigh(true);

                        // starting the countdown timer
                        Log.d(TAG, "rearming countdown timer to lock the door");
                        noBeaconsInRangeTimer.cancel();
                        noBeaconsInRangeTimer.start();

                        tiAlarm.alarm(100);
                        (MainActivityArduinoBeaconTexas.this).runOnUiThread(new Runnable() {
                                @Override
                                public void run() {
                                    tvDoorState.setText("Near home: Door unlocked");
                                    tvDoorState.setTextColor(Color.BLUE);
                                }
                            }
                        );
                    }
                }
            }
        });

        noBeaconsInRangeTimer = new CountDownTimer(10000, 2000) {
            public void onTick(long millisUntilFinished) {
            }

            public void onFinish() {
                // beacons are no more visible: turn off led / lock the door
                arduinoLed.setDigitalValueHigh(false);
                Log.d(TAG, "No doorlock beacons in range: turn off led / lock the door");
                tiAlarm.cancel();
                (MainActivityArduinoBeaconTexas.this).runOnUiThread(new Runnable() {
                      @Override
                      public void run() {
                          tvDoorState.setText("Far from home: Door locked");
                          tvDoorState.setTextColor(Color.RED);
                      }
                  }
                );
            }
        };
Below the full activity source code is reported:
#!java
        package  eu.angel.bleembedded.beacontest;

        import android.app.Activity;
        import android.graphics.Color;
        import android.os.CountDownTimer;
        import android.os.Bundle;
        import android.util.Log;
        import android.widget.TextView;

        import java.util.Collection;

        import eu.angel.bleembedded.lib.BLEContext;
        import eu.angel.bleembedded.lib.item.alarm.BLEAlarm;
        import eu.angel.bleembedded.lib.item.beacon.BLEBeacon;
        import eu.angel.bleembedded.lib.item.beacon.BLEBeaconCluster;
        import eu.angel.bleembedded.lib.item.beacon.BLEBeaconManager;
        import eu.angel.bleembedded.lib.item.beacon.BLEBeaconRegion;
        import eu.angel.bleembedded.lib.item.beacon.notifier.BLEBeaconRangeNotifier;
        import eu.angel.bleembedded.lib.item.generalIO.BLEGeneralIO;
        import eu.angel.bleembedded.lib.item.generalIO.BLEGeneralIOEvent;
        import eu.angel.bleembedded.lib.item.generalIO.BLEOnGeneralIOEventListener;

        public class MainActivityArduinoBeaconTexas extends Activity {

            protected static final String TAG = "MainActivity";

            TextView tvDoorState;
            BLEGeneralIO arduinoLed;
            CountDownTimer noBeaconsInRangeTimer;
            BLEAlarm tiAlarm;

            @Override
            protected void onCreate(Bundle savedInstanceState) {
                super.onCreate(savedInstanceState);
                setContentView(R.layout.mainarduinobeacontexas);

                BLEContext.initBLE(this);

                tvDoorState =(TextView) findViewById(R.id.tvDoorState);
                arduinoLed = (BLEGeneralIO) BLEContext.findViewById("arduino_rbs_general_io_5");
                tiAlarm = (BLEAlarm) BLEContext.getSystemService(BLEContext.ALARM_SERVICE, "bell_key_alarm");
                arduinoLed.setOnGeneralIOEventListener(new BLEOnGeneralIOEventListener() {
                    @Override
                    public void onBoardInitEnded() {
                        arduinoLed.setStatus(BLEGeneralIO.GENERAL_IO_DO);
                        arduinoLed.setDigitalValueHigh(false);
                    }

                    @Override
                    public void onDigitalInputValueChanged(BLEGeneralIOEvent bleGeneralIOEvent) {}

                    @Override
                    public void onAnalogValueChanged(BLEGeneralIOEvent bleGeneralIOEvent) {
                    }

                    @Override
                    public void onDigitalOutputValueChanged(BLEGeneralIOEvent bleGeneralIOEvent) {}

                    @Override
                    public void onServoValueChanged(BLEGeneralIOEvent bleGeneralIOEvent) {

                    }

                    @Override
                    public void onPWMValueChanged(BLEGeneralIOEvent bleGeneralIOEvent) {

                    }

                    @Override
                    public void onGeneralIOStatusChanged(BLEGeneralIOEvent bleGeneralIOEvent) {

                    }

                    @Override
                    public void onSetGeneralIOParameter(BLEGeneralIOEvent bleGeneralIOEvent) {

                    }
                });

                BLEBeaconManager.startBeaconRangeNotifier(new BLEBeaconRangeNotifier() {
                    @Override
                    public void didRangeBeaconsInRegion(Collection<BLEBeacon> bleBeacons,
                                                        BLEBeaconRegion region,
                                                        BLEBeaconCluster bleBeaconCluster) {
                        boolean isNear = false;
                        if ("doorlock".equals(bleBeaconCluster.getUniqueId())){
                            for (BLEBeacon bleBeacon:bleBeacons){
                                if (bleBeacon.getRssi()>-70){
                                    isNear=true;
                                }
                            }
                            if (isNear) {
                                Log.d(TAG, "door lock beacons in range: unlock the door / turn on led" + "--" + arduinoLed.getDigitalValue() + "," + arduinoLed.getStatus());
                                arduinoLed.setDigitalValueHigh(true);

                                // starting the countdown timer
                                Log.d(TAG, "rearming countdown timer to lock the door");
                                noBeaconsInRangeTimer.cancel();
                                noBeaconsInRangeTimer.start();

                                tiAlarm.alarm(100);
                                (MainActivityArduinoBeaconTexas.this).runOnUiThread(new Runnable() {
                                        @Override
                                        public void run() {
                                            tvDoorState.setText("Near home: Door unlocked");
                                            tvDoorState.setTextColor(Color.BLUE);
                                        }
                                    }
                                );
                            }
                        }
                    }
                });

                noBeaconsInRangeTimer = new CountDownTimer(3000, 2000) {
                    public void onTick(long millisUntilFinished) {
                    }

                    public void onFinish() {
                        // beacons are no more visible: turn off led / lock the door
                        arduinoLed.setDigitalValueHigh(false);
                        Log.d(TAG, "No doorlock beacons in range: turn off led / lock the door");
                        tiAlarm.cancel();
                        (MainActivityArduinoBeaconTexas.this).runOnUiThread(new Runnable() {
                              @Override
                              public void run() {
                                  tvDoorState.setText("Far from home: Door locked");
                                  tvDoorState.setTextColor(Color.RED);
                              }
                          }
                        );
                    }
                };

            }
        }
Let's run it
Finally run the application connecting the smartphone to the PC with the USB micro cable. Clicking Run button in Android Studio and selecting the connected smartphone the application will be deployed and run on it.
In this example, when the beacon is activated by facing it up, the led turns on, the alarm starts ringing, and the textview on the app's UI changes both text and color.
If the beacon is taken out of range or faced down, the countdown expires, thus the door is closed, and both led and alarm are turned off.
arduino-beacon-texas.jpg
arduino-beacon-texas-open.jpg
NOTE: If devices do not connect at startup, please shutdown all Bluetooth applications already running, like the BleembeddedFlasher app or previously launched versions of our app.